Saturday, February 24, 2018

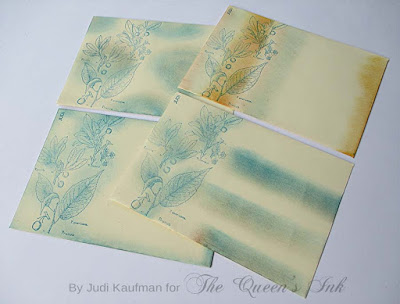
Red Castle Leaf Plate 1 – Faux Postage Plus Rotary Cards by Judi Kauffman for The Queen’s Inkling


Mail art, mail art! It’s time for some mail art…Faux (fake) postage, to be precise!

Have you ever made your own sheets of faux postage? It was a trend a decade or so ago, but I and many mail art fans have never taken a hiatus. So welcome back if you remember it from those days (everything old is new again, right?), and welcome aboard, newcomer, if it’s something you’ve never heard of before!

For today’s tutorial, I chose Red Castle Leaf Plates 1 and 2. Each sheet has five large vintage image stamps filled with realistic and very detailed leaves and small type (each one large enough for the front of an A2 card).

Creating faux postage is easy and fun and the hand-stamped sheets are perfect for cards, collage, art journals, ATCs, and to decorate envelopes. For envelopes: Position faux postage to the left of actual stamp, spaced so the post office knows you’re not trying to use your creations to fool them.
Last time I checked at The Queen’s Ink, there were only a few Red Castle Leaf Plate 1 and 2 stamp sheets left, and that means once they’re gone, they’re gone forever. In fact, they may be sold out by the time this tutorial is published. But if they're still there and you like this tutorial and want the stamps, please don’t wait. 

Reminder: Red Castle’s generous ‘Angel Policy’ allows you to hand-stamp as many projects as you want for your own use, and you can sell hand-stamped cards and other projects (as many as you want!), but electronic reproduction is not allowed – no scanning or re-sizing, no photocopying. Therefore, you can’t photocopy or scan and print duplicates of your faux postage sheets to use for your own projects or to sell by the sheet or otherwise. (Angel policies vary, so check with the manufacturer to be sure that what you want to do does not violate anyone’s copyright.)

INSTRUCTIONS:


1. Use a graphics program to create a faux postage grid (dotted lines that look like perforations on a sheet of old-school adhesive-backed stamps). Print onto lightweight white paper. Alternatively, use a sewing machine with no thread in the needle to perforate straight vertical and horizontal on sheets of paper. Individual stamps for faux postage sheets shown: 1.25” x 1.75” and 1.5” x 1.5”.

2. Using a craft sponge, smudge two different inks across the perforation-printed or machine perforated paper, alternating colors. Shown: One sheet has vertical smudges, the other is horizontal.

3. Repeatedly stamp images from Leaves Plate 1 and 2 in a dark, coordinating color. Trust your eye or use a positioning tool. (Red Castle stamps are un-mounted. Use whatever temporary mounting system you prefer - cling foam on the back of the stamps, or an acrylic block covered with Poster Tape and NOTHING on the back of the stamps. With the Poster Tape method, stamps can be immersed in water for clean-up and this is my method of choice!)
4. Stamp a 3” x 5” rotary file card for each card front. Smudge with inks in colors that coordinate with the faux postage sheet. For each card back, turn a second rotary card so that the tab is positioned in the opposite direction and add ink to that one as well. Score a line lengthwise on the top rotary card only and ink the ridge of the score/fold line. Using the Tim Holtz Tiny Attacher, staple each pair of cards three times along the score line. Stapling along the score/fold line allows the card front to hinge open like a folder.

Options: Substitute index cards with die cut tabs or pieces of recycled manila folders for the rotary cards! Before stapling the front and back, add un-tabbed cards and create a booklet.


5. Add torn collage paper (shown: faux cork gift wrap) and faux postage from the finished sheets to the rotary card fronts.
5. While you’re at it, stamp a batch of envelopes!

6. Don’t forget the inside of the cards. Add an ATC-size clear sleeve to the inside of the card and tuck in a gift card, poem, love note, or an ATC. Stamp a sentiment, add more collage and faux postage.

Here’s another look at the finished cards:

SUPPLIES:

Tuesday, February 13, 2018

Tissue? I Hardly Know You! by Judi Kauffman for The Queen’s Ink

Those of us of a certain age will remember this line: “Kiss you? I hardly know you!” (To the young folks among us: It’s what a nice girl said when a guy got ‘fresh’ – and if you don’t know what ‘fresh’ refers to, go ask your grandmother.)

Today’s tutorial is a play on those words, with emphasis on the word ‘play’ since this project is playful and fun – recycling, re-purposing, with a touch of silliness thrown in for good measure thanks to the ‘BFFs’ and ‘Start a new chapter’ stamps from RubberMoon that I picked up at The Queen’s Ink!

It all starts with a boutique tissue box that has something interested printed on it. (Almost all of them do!) Usually, the main portion of the box has one pattern and the ends that are overlapped and glued have a second pattern. And the nice thing about boutique tissue boxes is the oval opening that provides a great frame without any die-cutting.

One box provides enough cardboard to make two 4.25” x 4.5” cards, but as you’ll see in the ‘Options’ after the instructions, there are lots of other possibilities.


1. Carefully open the tissue box and lay it flat on a cutting surface.

2. Cut off the side pieces, leaving the four squares connected. Discard the skinny scraps, keep the four printed flaps. Cut the remaining piece in half, yielding two already folded card bases, one with an oval opening in what will become the front. Trim as needed so front and back of each card base are the same width.

3. Using a craft sponge or dauber to apply the ink, distress all edges with ink in a compatible color.

4. Using the same ink, stamp people, animals or other motifs that fit into the oval opening (shown: BFFs by Sunny Cavalho) and a sentiment (shown: Start a new chapter) onto lightweight mulberry paper. Leave plenty of space between them for tearing random shapes. Tear around the stamped images and tear some extra un-stamped pieces.


5. Adhere one flap piece under the oval opening. Adhere another to the back of that card base. Adhere the remaining two flap pieces to the front and back of the second card base.

6. Create collages as shown or as you prefer, covering various areas of the printing on the front and back of the card base with gold notary seals or die cut circles. Tie it all together with the stamped and torn mulberry papers and be sure to leave some of the original printed patterns from the box visible.

7. Line each card with more mulberry paper or other lightweight patterned or solid color paper.

More Options:

Instead of making two side-fold, cut into four separate square panels and use them as card fronts for four cards, doubling the output! (Solid color cardstock for the four card bases.)

Use the four pieces as front covers for four coil- or wire-bound journals or notepads. Make pages from old envelopes or folders, watercolor paper, printer paper, or a combination (Plain chipboard for the back cover of each.)

Use the side-fold cards as covers for a stitched book with one signature (2 sheets folded in half for 8 pages).

Instead of cards, layer the flap pieces over the folds, add all of the collage except for the stamped mulberry paper. Cut the resulting 4.25” x 16” down to 3.5” x 15”, and then cut into six 2.5” x 3.5” Artist Trading Cards. Finally, add the stamped pieces to the individual ATCs.

Use the oval opening to frame a photo, poem, or hand-written note instead of a stamped design.

It’s your turn! Get your friends to save their interesting boutique tissue boxes and see what you can come up with!

SUPPLIES:
  • BFFs by Sunny Cavahlo (RubberMoon)
  • Start a new chapter by Kae Pea (RubberMoon)
  • Boutique tissue box
  • Craft knife, straight edge, cutting mat
  • Lightweight mulberry paper (shown: Pink)
  • Gold rotary seals
  • Glue stick.
  • Ginger or other dark color ink

Wednesday, February 7, 2018

Tribal Cats: Valentines, Friendship Cards, Anniversary Cards and an ATC by Judi Kauffman for The Queen’s Ink


My last tutorial in January was Tribal Cats Envelopes featuring the Laurel Burch stamp set by that name. As promised, I’ve created an equally big batch of Tribal Cats Cards. I made Valentines that could also serve as anniversary cards by tweaking the color palette, friendship cards for cat-loving friends, and a collage style Artist Trading Card, just for the heck of it (shown above). 


Only one problem: The envelopes I stamped are A2 size while only one of my cards and the ATC will fit! Oh well. I’ve got a box of manila envelopes I can use for the rest. And this change of direction gives me an excuse to stamp and color more envelopes. And make more small size cards and ATCs!

With an upright tail for one cat, no tail for the other, and their bodies tucked close together, the card below is the one that is A2 size:
The remaining cards are much larger because there are more cats or because the tails take up so much more space or because I got carried away with the backgrounds, borders and sentiments…Squares measure 6.25” to 8”; rectangles measure 7” x 9.25” and 7.25” x 11”. The card with five cats (the second photo below) is much bigger than the one with three cats above it - this is a quirk of the blog software that sizes the images to the same width. And that's why the ATC looks as big as the A2 card.

Instead of step by step instructions, I’m going to let the photos do the talking and offer some DESIGN STRATEGIES:

Stamp the bodies and tails after they’re die-cut. This makes it easier to decide where the pattern should be. And it saves on the cardstock since shapes can be die cut close together.

No need to stamp the bodies or tails if you want to simply smudge on color to shade the shapes and add details like striped tails.
 5mm “Cat’s Eye” stickers are a nice way to add dimension and some extra sparkle.
Mix in floral patterns from Laurel Burch’s Blossoming Woman stamp set for bodies and tails. That’s what I used for the earlier A2 card as well as the over-sized card shown below.


Stamped sentiments on squares, circles and rectangles add contrast. The circles give the effect of a moon, don’t you think?


Use colored pencils, markers, or a mix!

Add dimension by allowing some of the cats’ tails to curl upward and by using foam tape underneath their faces.

Have fun with patterned papers as well as solid colors when you create layers and borders on the finished cards.

To make the cats more expressive or affectionate, turn their heads at an angle.

Use the non-curled end of the tail instead of the curly end now and then. Trim the die cut shape as needed.

Flat, oversize cards can be displayed on a tabletop easel, framed, or add a top-fold card base so they stand alone. 

OKAY, NOW IT’S YOUR TURN…

SUPPLIES: 
  • Tribal Cats stamp set (Stampendous)
  • Tribal Cats die set (Stampendous)
  • Blossoming Woman stamp set (Stampendous)
  • Start a New Chapter stamp (RubberMoon)
  • 5mm Cat’s Eye stickers (Stanislaus Imports, lasioux.com)
  • Gelly Roll pens in White, assorted nib sizes (Sakura of America)
  • Colored pencils (Prismacolor)
  • ProMarkers (Winsor & Newton)
  • Heart dies or punches
  • Square, circle and rectangle dies of choice
  • Ginger or other dark color inkpad
  • Cardstock in assorted colors
  • Stamped collage papers for ATC
  • Purchased patterned papers
  • Glue stick, double-sided adhesive tape
  • Foam tape

Thursday, February 1, 2018

New Class! Everyday Greetings by Nancy Sheads - February 27, 2018 at the Queen's Ink

I'm returning to the The Queen's Ink on Tuesday, February 27th to teach a Copic marker card class.  In this workshop, we'll make three cards featuring stamps from RubberMoon and sentiments from Penny Black. The images are colored using a very limited set of Copic markers. Details are below. All necessary techniques are taught in class. Seats are limited, so sign up today!

Tuesday, February 27, 2018, 1:00 PM - 3:30 PM
 Tuesday, February 27, 2018, 6:00 PM - 8:30 PM
Register online or call the Queen's Ink at (301) 497-9449

BRING TO CLASS: The list below reflects the Copic markers that I will use in class. You can follow along using the same colors OR substitute colors based upon your personal Copic collection. Please bring all your markers to class and make sure your Copics are marked with Washi tape or some other means of identification. Markers are available for purchase at The Queen’s Ink. Students will receive a 10% discount on Copic markers. I will be available prior to class to help with selection.

PLEASE NOTE: You must bring your own markers to participate in class. If you need markers, please contact The Queen's Ink in advance of class. If you wait until class time, you may not be able to purchase the markers you need.
  • Y02 - Canary Yellow
  • Y15 - Cadmium Yellow
  • Y19 - Napoli Yellow
  • YG06 - Yellowish Green
  • YG09 - Lettuce Green
  • B32 - Pale Blue
  • B34 - Manganese Blue
  • B37 - Antwerp Blue
  • R35 - Coral
  • R37 - Carmine
  • R59 - Cardinal
  • C4 - Cool Gray No. 4
  • 0 - Colorless Blender
OTHER SUPPLIES: Please bring scissors, foam adhesive squares (I used Scrapbook Adhesives 3D Thin Foam Squares), and a tape runner adhesive or double-sided tape.