Tuesday, August 30, 2016

Mermaids & More – Ten ATCs By Judi Kauffman for The Queen's Ink


One of the things I hope to accomplish with my blog posts here at The Queen’s Inkling is to showcase the versatility of the stamps and other supplies I use. Therefore, you’ll often recognize something you’ve seen in past projects!


For example:

Two weeks ago I incorporated a Rubbermoon stamp that says ‘Best Day Ever!’ into a series of torn paper collage Artist Trading Cards. This time its back as part of a trio of envelopes (one of them shown above) as well as providing some decorative linear elements for the ATCs. I inked up only the lines from above the text (shown below).


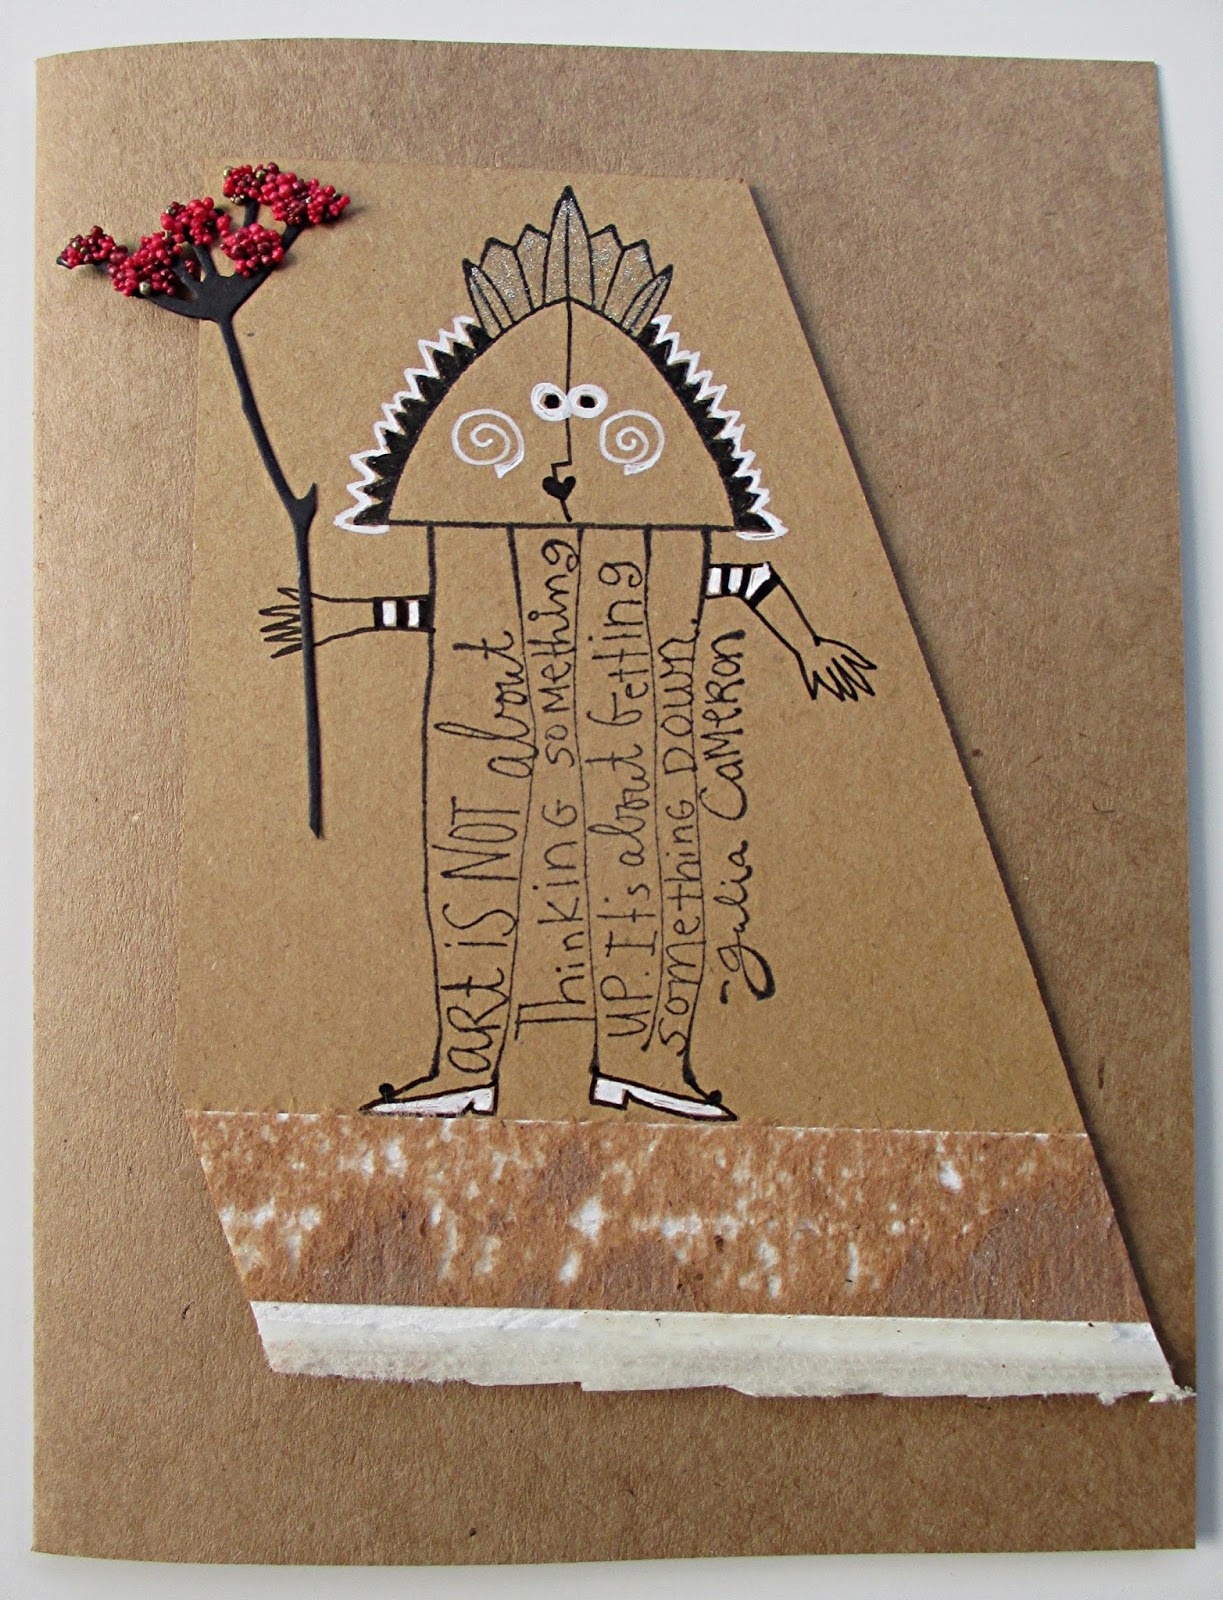
Last week I used the Shrine Top stamp as a head for some quirky figures and as a decorative element on a trio of cards. This week, it shows up turned upside down as a table on which a small figure stands, to the right on the envelope shown below.


This week I’m introducing more whimsical and wonderful Rubbermoon stamps - a mermaid, dog, bubbles, and more! Yes. I’m definitely a big time fan of this company’s images. Not to worry – Patti Euler, owner of The Queen’s Ink, will do her best to keep them in stock so blog followers can find them in the store or order over the phone.

And even though I designed ATCs only two weeks ago, I’m revisiting them, this time as simple ‘stamp and color’ projects. Such an easy and fast way to experiment – not too time consuming and SO much fun!

INSTRUCTIONS
If you are an experienced paper crafter, use the photos as inspiration and head straight to the supply list. If you’re new to stamping and want to create ATCs that look just like mine, please follow the steps below. Design Detours in italic font provide extra information and tips.

1. Cut an 8.5” x 11” piece of light tan cardstock into ATC-size pieces as follows: Cut two 2.5” wide strips and one 5.3” wide strip. Cut each of the 2.5” strips into three 3.5” long pieces. Cut the 3.5” wide strips into four 2.5” high pieces. Voila! Ten ATCs waiting to decorate…


2. Stamp a little scene on each rectangle. Use the same color ink and an artist’s sponge to smudge a bit of color here and there. Also smudge a contrasting color on some or all of the ATCs (I used bright yellow on one set of five). Design Detour: I stamped five pairs with two of the same composition on each pair, but it could have been ten different ones, or all ten alike. Vary as you choose! All of my ATCs are vertical rectangles, but yours don’t have to be.


3. Add dimensional glaze to selected areas of the ATCs, as shown above, and set aside to dry. Design Detour: I did this for one set of five ATCs, adding dimension and sparkle to the stamped bubbles, to the eyes of one of the figures and the dog, and to the area around the words ‘Sprinkle Magic’.


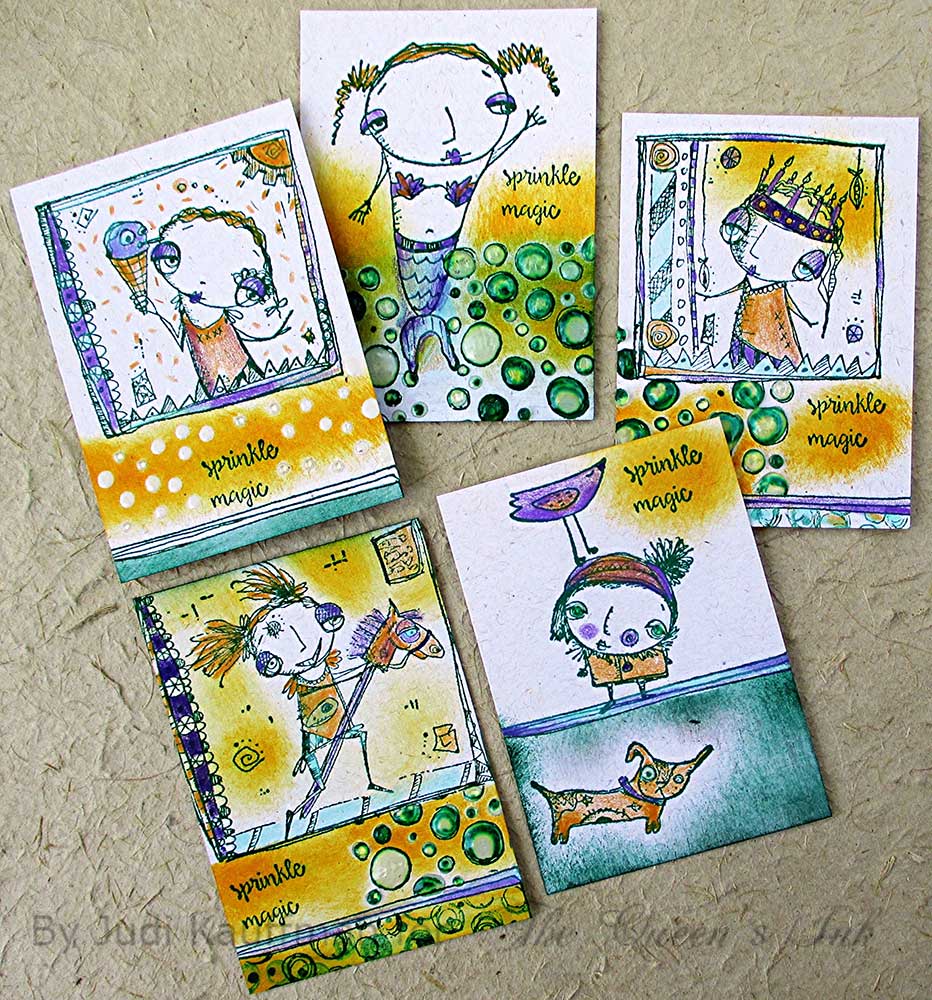
4. Color with pencils or markers. Design Detour: I used colored pencils with soft blends for the five ATCs with dimensional elements, shown above. I used alcohol-based markers for the other five, shown below – lots of bright colors.


5. Here are close-ups of the pairs to show how the choice of coloring medium can totally change the look:


6. Keep going…Stamp card fronts, bookmarks, gift tags, place cards – and don’t forget about the envelopes! Two were shown toward the start of this post, my third one is below. Design Detour: Hunt for stamps that coordinate with the stamping. The US Forever ‘Pets’ stamps are just perfect.


SUPPLIES
  • Rubbermoon stamps
  • Bright green ink
  • Bright yellow ink
  • Light tan cardstock
  • Paper trimmer
  • Dimensional glaze
  • Colored pencils (Prismacolor, shown, or brand of choice)
  • Alcohol-based markers
  • Artist’s sponge


Tuesday, August 23, 2016

Over the Moon for Rubbermoon! By Judi Kauffman for The Queen's Ink


I’ve been a fan of Rubbermoon stamps for many years. When I walked into The Queen’s Ink on August 6th to teach a class the display table just inside the door stopped me in my tracks. It was filled with Rubbermoon stamps! Before I’d even put down my tote bag and started set-up I went SHOPPING. (You know how that goes…)

The two stamps I chose for today’s projects were the first ones I picked up, though at the time I didn’t have an Inkling (pun intended) that I would soon combine them.

As always, one thing led to another. I stamped the Julia Cameron quote sideways on an envelope so the post office wouldn’t get confused by the text. All of a sudden it looked like a person. Bingo! I got out the Shrine Top and a figure appeared. A few quick doodles for feet, hands and face and the envelope was on its way…

This fun discovery led to cards with sideways-quote figures. Two of them are shown below.

While I was at it I made another one with a more traditional look, shown below.


RECIPE FOR THE CARDS:

Use the samples as a starting point. Duplicate them as shown or head in your own direction!

Combine two or more stamps in an unexpected manner. Design Detour: Turning a stamp sideways or upside down will help you see it in a totally new way.

Add in some scraps, do a bit of layering and collage with torn or cut pieces. Design Detour: The fuzzy pieces on the cards are leftovers from a newsprint pad (the strip that connects the front and back covers and secures the individual sheets).

Doodle, draw and color as shown or as you choose. Design Detour: Stamp a LOT of images so you can practice drawing the faces, arms and hands, feet, or anything else you want to add. Use glued-on collage or additional stamping instead of drawing if you prefer.

Mix in some die cut wildflowers (leftovers from the WildflowerTags published in The Queen’s Inkling on August 2, 2016).

Top it all off with embossing powder, flocking, micro beads, or another dimensional texture in selected areas. Design Detour: I used clear-drying Tombow Mono Aqua Liquid Glue topped with US ArtQuest ‘Berry Nice’ Prills, a jar full of fun...lot of colors and sizes in one mix.


Stick to a limited color palette. Design Detour: I worked with Kraft brown, grayish brown, and reddish brown cardstock and chipboard, plus red, white, and black. There are specks of gold in the Prills and I colored parts of the Shrine Top with a clear glitter pen.

SUPPLIES
  • Rubbermoon stamps: Shrine Top and Julia Cameron Quote
  • Black ink pad
  • Sakura Gelly Roll Medium in White and Stardust in Clear
  • Sakura Pigma Micron 01 in Black
  • Sizzix Tim Holtz Wildflowers die set
  • Clear drying glue
  • US ArtQuest Prills in Berry Nice (or other texture medium – micro beads, embossing powder, flocking powder, etc.)
  • Assorted cardstock, chipboard, folders, or envelopes in shades of brown and gray

Tuesday, August 16, 2016

Magic Stamp ‘After Party’ By Judi Kauffman for The Queen's Ink


I came home from teaching the fun-filled ‘Magical Land of Magic Stamp’ class on August 7 with stamped bits of newsprint that the students gave me as a souvenir. I planned on using them for an art journal page.


As usual, one thing led to another and as I tore the paper into pieces for my collage I decided to go in another direction. I glued everything to a 12” x 12” sheet of mustard gold cardstock and stamped over it, using the blocks I made in class as part of the demo.

Then I cut the square into Artist Trading Cards that I’m going to take back to The Queen’s Ink as a souvenir for each of the students to pick up on their next trip to the store! There were 14 students and I was able to make 15 ATCs, one for Patti and the gang.


The photo above shows the collage before it was cut into pieces. It is relatively random, but I did try to keep some of the image-based pieces (like the lion) from getting lost. Here are some close-ups to show how I overlapped the scraps:


The photo below shows how I did the cutting. Two rows at the left are 3.5” wide for a yield of 8 ATCs and 2 scraps. Two rows to the right are 2.5” wide for a yield of 6 ATCs and 2 scraps.


As you can see from the photo above and the close-up below, I ‘cheated’ when cutting the row at the far left to keep the whole lion’s face instead of chopping it.


Because I wanted to end up with 15 ATCs, one more than the number of students, I overlapped the two 3.5” wide scraps from the rows at the left to give me that all-important fifteenth card. (I considered keeping the remaining two scraps but did something radical – I put them in the recycling bin! And left them there…)


Next stop, the ‘After Party’! Time to take each of the ATCs to the next level!

I stamped each one ‘Best Day Ever!’, distressed the edges of the rectangles with the same ink (my go-to dark teal green) and started coloring, adding embellishments to each as a final touch.

I used:
  • Rubber Moon ‘Best Day Ever!’ stamp by Sunny Carvalho
  • Dye-based ink in dark teal
  • Prismacolor colored pencils
  • Elizabeth Craft Designs Glitter Dots peel-offs (Transparent/Gold)
  • A white gel pen
  • A fine nib black pen
  • A copper metallic paint pen
  • Scraps of alcohol ink-altered Shimmer Sheetz
By popular request, I will be teaching The Magical Land of Magic Stamp again in the fall!!

Here are the finished ATCs:


Tuesday, August 9, 2016

22 + 93 = _____ ? 14 x 2 = _____ ? By Judi Kauffman for The Queen's Ink


Simple arithmetic, right? Not necessarily. The first equation refers to how I feel after teaching Make an Impression and The Magical Land of Magic Stamp classes at The Queen’s Ink on August 6 and 7 and after spending both days helping with the Trunk Show event where my own limited edition rubber stamp sheets were for sale.

From the neck up I’m 22, batteries 100% recharged, my head so full of ideas that I’m surprised I don’t topple over, enough energy for three people and great memories spinning around like the gymnasts at the Olympics. From the neck down I’m 93 with tired feet and knees, ready for a nap right after breakfast, and if you asked me to carry my purse across the room I’d have to demur. 

So: 22 + 93 = 1. Yours truly.


How about the second equation, 14 times 2? There were fourteen students in each class with some people attending both, so 28 people wasn’t the actual head count. But my version of math isn’t traditional. I’m factoring in the following facts: Each person created and/or painted well over a dozen pieces of Delight Air Dry clay (the count was higher on several tables). Factor in the 150 blocks of Magic Stamp that were used to stamp envelopes and folders and cardstock and newsprint (or went home in pristine condition, waiting to be used later). Multiply that figure by the number of ideas that were shared, the number of projects envisioned.

So: 14 x 2 = an infinite number.


I wasn’t the only one whose head was spinning! A student who has worked extensively with polymer clay thought that Delight was, literally, a delight. One student has already planned her own Magic Stamp class. (She’s going to teach the other teachers where she works.) Another is heading to India with stamps she bought, as well as a big stack of lightweight Magic Stamp blocks.

A little detour: I once put a carry-on suitcase filled with Magic Stamp blocks into the overhead bin of an airplane using only one hand to lift it and the men around me looked on in amazement and applauded, thinking (incorrectly) that I must be some kind of bodybuilder instead of just a person traveling with foam blocks!


The photos in this blog post are from the Make an Impression class. Photos and a re-cap of the Magic Stamp class will follow later.

The projects you’ve seen so far are the samples I made to illustrate how the clay pieces could be put to use.

The photo gallery that follows shows students’ work.

By popular request, we’re going to schedule a repeat of Make an Impression this fall! And we will have enough sheets of my deep etched red rubber stamps to have another trunk show. Magic Stamp classes will continue as well.

Be on the lookout for dates and times!